Thursday, January 1, 2015

DA:I - Male Elf sliderset "Deyvin"

Someone on Tumblr asked a question on how to create good looking male characters in DA:I.
My response was quite short, as it really just takes a bunch of messing around, no real 'trick' to it.
I figured I'd offer some premade characters people can straight up play as is - or use as a base for further customization. So, for those that don't like to spend ages in a CC and appreciate a sliderset over a save-game, preserving the ability to create your own with the Keep, this is for you!

No credit is necessary although obviously a link to the source would be appreciated if you are ever directly asked =) Redistribution prohibited, if I want to share this preset on other mod and/or sharing sites, I'll do this myself.

I plan to do more of these over time so keep an eye on my Tumblr or my blog here to stay up to date.

Some ingame shots of Deyvin:


And here are his slider settings:


And that's that, have any questions, shout, otherwise GAME ON.

Saturday, June 14, 2014

ME3Explorer: Using TPF/DDS Tools 2.0

In order to apply your Texmod TPF permanently to the game, the developers of ME3Explorer have created a nifty little thing called the "TPF/DDS Tools". It will allow you to load in any TPF, check it's file formats for validity and if valid, apply it directly to the game as you would a .mod. You can also create your own fresh .mod for the textures with this tool. This means that downloading a fixed format TPF will ensure you never have to pay attention to the Revision a texture-mod was built with in relation to the version you are using.

 Here's how you apply TPF's straight into the game:
Launch ME3Explorer, go to "Tools" and pick "TPF/DDS Tools" in the dropdown menu.


In the window that pops up, click "Load TPF" and browse to the TPF you want to install.


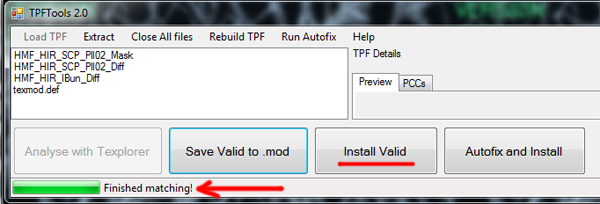
Once you've opened it you'll see that the textures are listed now as is the texmod definition file (def). The definition file will help tell the game where these textures belong.


Every texture has it's own unique hex id or hash number (0xDB481023 for example), the game uses these to match them to the right textures in the game files. Texmod definition files provide the link between the filenames and the corresponding hex id's automatically when the tool can't find these id's in the filename itself.
Now down at the bottom it'll tell you the Hashes were generated, click the "Analyse with Texplorer" button to let it scan if the formats are fitting for permanent replacement.


Once it's done it'll say "Finished Matching!". You can now hit "Install valid" to permanently install all valid textures to your game.

 ----------------------------------------------

 Now sometimes you might run into TPF's that are not in the right format and/or cannot be matched to their ingame counterparts. For these and other such issues I suggest you check out the more expansive tutorial on the TPF Tools by KFreon and the guide on fixing format issues with TPF's by KFreon.

Monday, January 13, 2014

Guide: Texture information for aspiring modders


Prologue

My background lies in traditional and digital art. This guide is meant for people like me, who don't have a background in game- or 3D design and won't inherently understand how things tie in together in this particular field. In retrospect, had I known what information to look for before beginning, I'd have had a less difficult time understanding how textures work and how they could be manipulated.

The Mass Effect series was created with an custom version of the Unreal3 Engine. The engine much determines how textures work and while there is some nuance between games, the general setup is largely the same. As an example, I've also done some modding for "Remember Me" and was easily able to with knowledge acquired modding the ME series.
I've experienced the same with "Dragon Age: Inquisition", which was built on the Frostbite 3 engine. So, while this guide was initially written for ME(3) texture modding, I've noticed that for DA:I specifically, the principle carries over with the exception of specmap material functions seeming more consistent and normal maps having a different format. The most important thing to remember is that most textures won't make sense until you view each channel separately and to always mirror against the channel usage of the original texture.

I've sat on this tutorial for a while, having it almost completed and it's sister sitting in my ME3 modding thread, with the rise of DA:I (texture) modding I figured it a good time to give a final edit and release it.


Texture maps
in ME3 and beyond

The following information might not bring anything new to some but it helps to start from the beginning so we can better understand what ME3 (or most any game for that matter) does with their textures and how things tie together. Working with textures for any game isn't so much about knowing exactly what they've done as it is about learning to recognize why and how they've done it. Lets take a look how Mass Effect works with texture maps and what you are likely to run into.

Remember that the way a texture functions is determined by the material and cannot be changed on the fly from the texture itself, as such it's important to look at the original closely when planning to edit a texture yourself.

Diffuse map

The diffuse is the most frequently used texture mapping method. It's a bitmap image wrapped directly onto the 3D mesh while displaying its original pixel color. This means that you can use any image as diffuse map to represent photo realistic quality. While some diffuse textures in Mass Effect will indeed hold colour information, others will be greyscale diffuse maps that get their colour information from a separate tintmap.

Function can be linked to all the different channels on a texture. Any single texture has up to 4 channels, R (red), G (green), B (blue) and, A (alpha). When you use the R/G/B channels together you can create a texture that holds it's own colour information. Most diffuse textures will also not have a functional alpha (or lack it entirely) and as such are most often a DXT1 without alpha to save on diskspace (file format). Those with alpha are DXT5. There are exceptions where colour is not put in the diffuse directly and the diffuse can be fit onto one channel rather than needing all three and that's where it can get confusing.

When creating a custom diffuse map I use both brushes and images for textures.
Good to remember is to avoid images that have lighting effect in them. While some highlighting and shading is done in the diffuse, most of it is controlled through the specmap and when you put it in the diffuse where it wasn't originally, it'll look all kinds of wrong.
On the flipside, if your diffuse does have lighting or shading in places put it back in! If it's in there, it's in there for a reason! I get this is hard for people working with a mouse but a lot of people don't do this and you end up with a flat diffuse that actually makes the whole look less realistic. This is also the reason I would suggest to anyone looking to seriously start texture modding to buy a drawing tablet. It doesn't have to be big, a bamboo is absolutely fine, it'll make this kind of work TONS easier. A big chunk of work I do on a diffuse will be manually painted on, having a tablet is a must for me.

If you are looking to introduce more detailing on a flat surface with little to no texture, you can use layer style screen or overlay to more easily add structure to it without having to recreate the entire surface. Be careful that you don't overuse this! There's really only a handful of places I've been able to use it where it worked, instead of making the surface look like a bleeding mess. It's not an auto-win button, but when it works, it saves time. Very situational.

Some tips:

  • Use 3DS! Load in your mesh and your diffuse texture so you can see what you are doing without having to take your texture ingame.
  • Group your materials together. Metal with metal, cloth with cloth. It'll make it easier to create the specmap later on.
  • Use masks to add colour to elements. This makes it easier to create recolours for your retexture later.
  • Put shading and highlighting on a separate layer and/or use masks for this as well.
  • Shading and highlighting, put it back on the diffuse when you retexture!
  • Learn how to use the pen tool, I can't express how important this tool is.
  • Make sure your patterned areas are the same size on each element. Element wrap sizes differ so having them all the same size on the texture does not mean they are the same size on the model, quite the opposite.
  • Take your time finding free stock (seamless) textures you can work with. You can make smart use of content aware fill in Photoshop (CS5+) to make a texture larger than it originally was. It's success depends on the textures structure, but be sure to look into it. The quality of a retexture halfly hangs on the quality of the stock used and smart texture selection.
Find common diffuse maps below to get an idea of what one might look like:


Specular map

You use specmaps to define the shininess and highlight colour of a surface. The higher the value of a pixel (from black to white), the shinier the surface will appear in-game. Therefore, surfaces such as dry stone or fabric would have a very dark specular map, while surfaces like metal or plastic would have lighter specular maps. 
The specular map is a peculiar thing in Mass Effect and has confused quite a lot of people in the past. Specmaps are inherently grey-scale, though in Mass Effect they won't look like they are.

While a diffuse needs the R/G/B channels you don't need those channels on a specmap. A DXT5 for example has 4 possible channels (R/G/B and alpha) and seeing the information held in a texture's channels is in essence just grey-scale information it's often so that these channels are independently used to map different functions. So, while Mass Effect and us modders call these textures the specmap, they are always a combination of several different maps spread over the channels of one texture which will include the specular map.
Putting all these different functions in channels of the same texture is essentially a filesize consideration. A texture with R/G/B and a functional alpha will be a DXT5 with interpolated alpha. Because this holds information for what would otherwise be 4 unique R/G/B channels (thus textures) and a DXT5 is about twice the size of a DXT1, they are saving half the diskspace (roughly put) while gaining flexibility.

Seeing a specular map is in essence grey-scale you'll sometimes see that the information on the R/G/B channels is identical resulting in a desaturated image. However, when you map things per channel the channels together make quite a colourful whole. Check out the specmap for this torso piece:


In this case the "typical" specmap most definitely sits on the green channel; as you can see it's a logical grey-scale with the fabric being slightly darker (less reflective) than the metal and carbon elements. The red and blue channels both completely black out certain elements which means these are both not a traditional specmap but are more likely to be glowmaps or maps that control sheen. The alpha channel clearly maps lights here.

While Mass Effect will often use the same colour channels for the same kind of functions, they're not completely consistent about their channels usage and that is really the hardest part of working with a specmap and creating a custom one. Finding out what function they've attached to each individual channel through the material itself and how to manipulate them to get the effect you desire. It's good to remember that, because any channel information is greyscale knowing that white is positive and black is negative, making a channel completely white will flood it's particular function across the surface the texture maps, alternately make the channel black to cancel out the effect it controls. It can be an effective way of finding out what any one channel effectively controls and how it makes elements look ingame.

Now the function attached to a specmaps channels isn't something you can manipulate via the texture itself, somewhere in the game (material) they hardcoded which channel maps which effect. This means that when you replace a mesh with another you might have to redo the specmap as the channels might not be hooked up to map and control the same functions.
Here are some of the functions that you can encounter mapped to one of the specmap's channels:
Glow, (coloured) Sheen, (coloured) lights, colour overlay, glossiness, transparency, material overlay effects (like glass for visors), animation frames (for instance animated text overlay cutoff points).
Basically every channel has it's own 'setting' in the material that determines exactly what kind of overlay effect it's tracking, all to make different material types like metal/leather and cloth look as realistic as possible in the engine.

Now sometimes you'll run into diffuse textures that don't seem to have a specmap to go with them, an example of this are the Mass Effect facial textures. Let's look at one of them:

The game needs a specmap to process an object in the lighting-engine, here it's actually hiding in the diffuse alpha. When an object doesn't need a lot of functions mapped to it, the number of channels/textures needed naturally drops where sometimes the separate specmap isn't necessary anymore. Most specmap textures will be DXT5 including an alpha, very rarely you'll encounter a DXT1 spec without alpha or a DXT1 with a 1 bit alpha.

Normal map
Normal Maps provide 3D detailing to an object. They are generated from the original high poly count 3D model of the mesh in question. As such, it's useful when creating a new normal map to work off the base of the original. Usually I upscale the original, depending on the object about half the size of the diffuse/spec unless it maps a full-body surface in which case I sometimes end up going up to 4096 on the diffuse and normal map alike. I then use the diffuse and Nvidia's normal map filter for Photoshop to generate a normal map.
I only tend to replace the original normal map in places where I changed the textures to such an extend as it being unavoidable. All other times I will smooth out the jagged edges on the original and overlay detailing generated with the Nvidia normal map preserving the original normal map.
ME3's normal maps are V8U8's. I save my edited normal maps as a BMP in Photoshop, then use the Direct X texture tool to convert to V8U8 and generate MIPs. Using a different file format will wreak havoc on your texture seams ingame. If you are modding a different game you can assume the same applies for it's native normalmap format and replacing it with one in a different format.

Some tips:
  • Using the Photoshop normalmap filter, dark elements are automatically indented and light elements extruded. If you are trying to generate a map for a metal surface with white scratches, on default settings the filter will extrude them instead of indent. Flip the Z axis if you want to reverse this. You can cut and paste bits together with the axis inverted or normal depending on what kind of material surface you are dealing with.
  • You can run the filter several times on different hardness (5-60) settings, then overlay each layer on a percentage to get a nice and fluid normal map with more depth.
  • If your normal map becomes too pitted and irregular due to the diffuse detailing, consider running a gaussian blur over the diffuse before you run the filter.
Find common normal maps below to get an idea of what one might look like:


I am adding a little note here in regards to DA:I normal maps as these have a different native format and will need to be edited differently. DA:I normals are in ATI2 (3Dc) format, it has two channels (X/Y instead of R/G/B). The Photoshop DDS plugin decompresses the X/Y blocks and stores them in the R/G channels (the wrong way around mind you). When the opened texture is flagged as a normal, R/G/B is reconstructed from the R/G channels. Unfortunately, this makes the normalmap look 'wrong' upon import into Photoshop.
Now I used to eyeball the changes necessary to convert the opened normal back to what it should be by manually switching the red and green channel and messing with the contrast for those channels. However, I've recently stumbled across this workflow by MediAsylum on DeviantArt which makes the process entirely foolproof. Go thank them for being awesome. Here's a step by step:
  • Open your extracted normalmap in Photoshop.
  • In the NVidia DDS Read Properties window select "Convert images to 32bits"
  • Upon opening, go to "Image - Mode - 16 bits/Channel". 
  • Select "Exposure and Gamma" from the dropdown and hit "OK".
  • Go to "Image - Adjustments - Levels..." and change the center value from 1.00 to 0.45
  • Go to "Image - Adjustments -  Channel Mixer" and switch the red and green channel info (select red in the dropdown, change red 100% to 0 and green 0% to 100, then do the opposite for the green channel).
Et voila. You can now edit your normals as you're used to. When you're happy with your changes, save it as a 3Dc through the DDS plugin.
For reference, below you'll see a normal as previewed in the tool, after export/opening in Photoshop, before flipping the channel info and after applying ALL changes as mentioned above. Note that an extracted normal opened in the Compressonator also has switched R/G channels (3rd image).
NB: If you previously got rid of the NVidia DDS Read Properties dialog popup (like I did), you can get it back by saving a random image as a DDS and pressing "Read Config..." in the save dialog window. This'll pop it back up and you can recheck the box to re-enable the dialog.

Tint map
Tintmaps are used to add colour to a surface with a greyscale diffuse. They function as a colour overlay on-top of the diffuse greyscale information (much like a colour overlay layer works in Photoshop) preserving all detail on the diffuse itself and making it possible to have multiple colours of an item without needing a custom diffuse for every variant.
In essence these are function maps, with information either positive (white) or negative (black).
Tintmap channels all mask function dictated by the material. As an example:

You can see how the R/G/B data together looks and how the channels separately look, if an alpha is present it would hold the same kind of black/white data as on the R/G/B, masking parts of the texture surface for material control. You can't manipulate the function each channel maps from the texture, this is determined by the material itself.

Stripe map 
Stripemaps are used to add pattern-colour to a 3D model with a greyscale diffuse and tintmap. They function as a colour overlay on-top of the diffuse greyscale information, much like the tintmap.

Wednesday, September 25, 2013

The Kuwashii Challenge: .MOD script manipulation

The Kuwashii visor has been a sore sight to many since it's introduction in Mass Effect 2 due to the position of it's rotating reticule in relation to the eye. There have been several modders in the past that have released reticule position fixes for the visor for both ME2 and ME3, which was unfortunately only possible at the expense of it's dynamic reticule. This is because we as modders cannot influence the position of the animated texture overlay and are left with no option but to "clear" it and to paint a static reticule on the main visor texture instead.
Kuwashii_1


I wanted to release my own visor/reticule fix combined with a re-textured framework to fit with my armor-sets, unfortunately I ran into an additional problem as it seems the dynamic reticule is shared with Garrus' visor which causes the reticule fix to indiscriminately break the dynamic reticule for both Shep and Garrus alike. Texmod and ME3Explorer use the hex identifiers for images to automatically match it's replacement across the board. For Texmod this is something that can't be manipulated and as such the situation for Garrus can only be resolved by sorting a static reticule directly onto his visor texture.
Kuwashii_2


We do have some options using ME3Explorer while creating a texture replacement .MOD as we can manipulate the automatically generated mod script to skip certain PCC file references and only apply our modded textures to a selection of our choosing. Because this is (not yet) an automated process this has to be done by hand by going into an automatically generated script and adjusting the PCC references and IDs belonging to the texture instances.

You would assume that if Garrus and Shepard are both affected by a .MOD, the fix would be as simple as adjusting the replacement script for the reticule to only apply to PCC files associated with Shepard. 
To do that you'll first have to create a .MOD, what I did here was feed the TPF straight into Texplorer's mod generator and let it create a .MOD.
Kuwashii_3
When you do this Texplorer will automatically match all instances of a texture and create a list of PCC files and IDs to replace in the script for every texture.


You'll notice that when I selected the dynamic reticule (TUR_HED_PROGarrus_Holo_Diff) in the list in ModGenerator that the info tab shows all PCC files and associates IDs it will add to the script.
I can't change that list from here but I can load in a generated .MOD through ModMaker and preview the script for the texture replacement jobs from there to edit them.
 As you can see, the script lists 8 PCC files total and the highlighted 2 are clearly associated with Shepard. I removed the 1st and 4th through 8th line here, only keeping the 2nd and 3rd.
Scrolling down a little I did the same on the ID's. Similarly there are 8 ID's listed, so I'm keeping the 2nd and 3rd and removing all others. The script repeats this list a bit further down, so I applied the same changes to that section. After editing the lists looked like this:


After having edited the script, I hit save changes on the preview windows and re-saved the .MOD so it would include the changes I made to the script.


In a perfect world the issue would now be resolved, unfortunately it showed through ingame testing that out of the 6 PCC files associated with Garrus, 4 use a material reference that ties in with Shepard. This meant that in practice, the script manipulation only worked for Garrus on the Normandy and the dynamic reticule was preserved there, but it stayed broken in Explore mode. As such I figured I would add a texture replacement job for a version of his visor including a static reticule like in the texmod version, but only for the instances in which his dynamic reticule was broken.

The method for this change is exactly the same as the one detailed above, with the exception of me keeping different PCC files in the list this time around. The edited script for Garrus' visor (Visor_Frame) ended up looking like this.
 Et voila!


Script manipulation is not the only tool available to us when trying to achieve a certain effect.
You can adjust meshes through a 3D editor, adjust the UV map (texture wrap), manipulate the texture through a photo/image editor like Photoshop or change the material assignment through Meshplorer. Which method serves your specific problem best often comes down to trial and error. In this case, after having tried all other options available to me, I settled on script manipulation as the best solution. I hope this will prove helpful to some.

The completed Texmod TPF and ME3Explorer .MOD for the Kuwashii Visor are featured in my BSN Thread.


Sunday, September 1, 2013

Guide: ME3Explorer first time setup information


What is ME3Explorer?

ME3 Explorer is a fan-built toolset used to mod the Mass Effect Trilogy. Several features are still under development and new features are still actively being introduced. With it you can decompress, load, edit and save PCC files. You can mesh and texture mod and create content mods for ME3 within the constraints of the tools and the limitations of the game itself. The toolset is useable for mod creators and for those that simply want to apply already created mods.

Why this guide?

This guide is specifically meant for people looking to start using ME3Explorer as a means of permanently replacing textures and meshes in Mass Effect 3. I might add information specific to the tools for ME1 and ME2 as well at some point but this guide is not specifically tailored towards modding the older games.

First things first

Backup your vanilla install files in the Mass Effect 3 folder. The tool does not affect game saves or other Mass Effect 3 files except the ones listed below:
  1. Make a backup of "PCConsoleTOC.bin" and "PCConsoleTOC.txt" in "..\Origin Games\Mass Effect 3\BioGame". You can rar/zip them up together and mark them as your vanilla backup.
  2. Make a backup of your entire "CookedPCConsole" folder (all PCC and TFC files) in "..\Origin Games\Mass Effect 3\BIOGame\CookedPCConsole". Mark it as your vanilla backup. 
Which version should I install?

You can choose to download and install ME3Explorer one of two ways.
  1. You can use the latest SVN release. It is used by the coders behind the project. Releases are referenced by their revision (REV) number. SVN is a Revision Control System: a repository of files, often the files for the source code of computer programs, with monitored access. Every change made to the source is tracked, along with who made the change, why they made it, references to problems fixed or enhancements introduced by the change. You can decide to use this version to be completely up to date and to help test bugs in the newest revisions of the program.
  2. You can use the latest stable release from Sourceforge, which is often shorthanded to the "SF release". The SF is the latest SVN REV the creators deemed stable enough to transfer over. It will offer a choice between a Source and Binary release, you'll want to grab the latter. This version is specifically meant for those looking for the most stable solution that are not interested in bug-testing and helping development. It is always going to be slightly outdated. While most stable, this version is not necessarily bug-free.
As of this writing (updated Juli 29th, 2014) the most recent SF release is Version 0109k (Jul 7th, 2014). This the counterpart of SVN REV 653. The most recent SVN REV is currently 657.
Seeing this information is transient, it is always advised to check the bug report section on the ME3Explorer boards to make sure there are no mayor bugs with recent releases reported. It is also always good to simply ask if you are unsure how to proceed.

I normally always advise using the SVN as you will not be able to receive any support using older versions of ME3Explorer due to it being in constant development.At the moment however, my advice is to use the latest SF or SVN rev 653.

 ME3Explorer on Sourceforge           Tutorial on using SVN                    
ME3Explorer Bug report section       ME3Explorer version release News

Installation and first time setup

When downloading the SF you can place the Binary folder anywhere you find convenient (the SVN download is explained in the tutorial I linked above).
Now you'll want to navigate to the following locations to start up "ME3Explorer.exe": "..\Binary\" (SF) or "..\ME3Explorer\bin\Debug\" (SVN). 

ME3Explorer doesn't conventionally install so when you doubleclick the exe, the program will simply open. It is not yet ready for use though, as it needs to go through a one time setup procedure that will allow it to create and scan some necessary files in your game's install folder.
To start that process we'll have to start up Texplorer which is located under "Developer Tools".
You'll get a popup asking you if you want to edit DLC content as well.

This prompt allows you to pick whether you would like to mod the basegame only or the DLC content as well. While you might think there's no harm to include the DLC, there are several considerations before deciding which way to go with this so please carefully read the following section.

Why do we get this option at all?

Due to Origin's frantic DLC checking, it is impossible to mod DLC content without it throwing authentication errors once it's checked. As such, when you mod DLC content, you are forced to use a  'fix' that spoofs the DLC check communication for you and validates your DLC.
Download the DLC fix here: ME3 DLC Patcher. Simply copy the two provided files into "..\Origin Games\Mass Effect 3\Binaries\Win32\" and say yes when prompted to overwrite.


Scan without DLC

Texplorer will create a tree-structure file (me3tree.bin) of about 6mb in "..\ME3Explorer\bin\Debug\exec\" (SVN) or "..\Binary\exec\" (SF) that it can (re)use to visualize the game's file-structure and to enable you to browse through and manually replace texture files. Upon running your first mod Texplorer will additionally create a file called “CustTextures0.tfc" in "..\Origin Games\Mass Effect 3\BIOGame\CookedPCConsole" and it will create an entry for that file in your "PCConsoleTOC.bin" that tracks it’s size. The scan will take about 15 minutes to finish depending on your setup. 

Scan with DLC

Texplorer will create a treestructure file (me3tree.bin) of around 20mb in "..\ME3Explorer\bin\Debug\exec\" (SVN) or "..\Binary\exec\" (SF) that it can (re)use to visualize the game's file-structure and to enable you to browse through and manually replace texture files. It will scan the basegame and will unpack parts of the DLC SFAR contents in theie respective DLC folders. These files are necessary for DLC modding so you can't delete them once Texplorer is done generating the treestructure file. Upon running your first mod Texplorer will additionally create a file called “CustTextures0.tfc" in "..\Origin Games\Mass Effect 3\BIOGame\CookedPCConsole" and it will create an entry for that file in your "PCConsoleTOC.bin" that tracks it’s size. The scan can easily take up to 2 hours to finish depending on your setup. 

Note: Seeing DLC is unpacked during a scan it's a good idea to back up your unmodded DLC folder, though optional as you should create a backup of the unpacked state as well after treescan has completed.

After the scan

Texplorer generated your treestructure file called "ME3Tree.bin" in "..\ME3Explorer\bin\Debug\exec\" (SVN) or "..\Binary\exec\" (SF). To avoid unnecessary rescanning when something goes wrong for whatever reason, make a backup of your treestruct. You can mark it basegame or DLC, whichever is appropriate, and be sure to add the revision number it was created with as well.
You can do this by hand, or use Texplorer's tree export functionality introduced in SVN REV 628.

If you opted to scan with DLC, make a backup of your entire DLC folder so you preserve the vanilla post-scan state of the folders to again avoid unnecessary rescanning.
When scanning with REV 623+,  make a backup of your entire DLC folder after treescan is completed as it's in unpacked state after so to vanilla compatible with your new tree you'll need a backup.


Formats Explained 

.PCC - The PCC format is what Mass Effect uses to package the game's content. As PCC files are the entire package, they can overwrite any changes made to the same file before replacement, AKA PCC mods should always be applied first as .MODs and TPFs can do specific replacements inside these modded PCC files keeping previous changes intact as long as they don't overwrite the same object inside them.

.SFAR - The SFAR format is what Mass Effect uses to package the game's DLC content. Every individual DLC has it's own default.sfar located in uniquely named folders at "..\Origin Games\Mass Effect 3\BIOGame\DLC\".

.MOD - These are packages created by ME3Explorer that can hold binary, object and PCC replacement jobs. Because scripts used for the replacement jobs are included in the .MODs these are revision sensitive while the toolset is still under development, pay attention to which revision a .MOD was created with.

.TPF - Texmod is a utility to browse, extract, save and modify textures in Direct3D 9 applications. In order to share and distribute texture modifications, TPFs (Texmod Package Files) can be created which are compressed to prevent further modification. This modding method allows you to temporarily replace any texture in your application without the need to use an application specific modding tool or replacing any files in your application's installation. Using ME3Explorer, you can convert Texmod TPF's to the ME3Explorer .MODs format or you can load them in directly using the 'TPF/DDS Tools 2.0' and apply them to your game permanently.

.mod Compatibility

Be aware that DLC mesh .mods and basegame/DLC texture .mods created between REV592 and REV622 will no longer inherently work on REV623. This means the current SVN (628) is not compatible with the latest SF (600). TPFs still work as before through TPF/DDS Tools. In simple therms: Make absolutely sure .mods you are downloading are documented to be compatible with your version of ME3Explorer, be it SVN or SF release. Older mods can cause errors and/or simply won't apply correctly or at all.

You can use .mod fix capability in ModMaker post REV 628 to automatically fix the script for that .mod to work with the newer REVs. While this might work, we can't guarantee it will and best practice is always to seek out mods that are inherently compatible with the revision you are using.
We do recognize this isn't always possible.

To avoid issues with texture .mods caused by REV changes, you can opt to download .tpf files instead. The TPF/DDS Tools included in the toolset allow you to either directly apply a .tpf to the gamefiles as you would a .mod, or you can turn your .tpf into a .mod for your current revision.

Selecting mods

Any .MOD that was created with a DLC struct can be used to apply to basegame content, but whether it'll replace DLC content depends on your personal setup in regards to the treestruct you are using. Any .MOD that was created with a basegame struct is completely incapable of replacing DLC content, whether or not you are using a DLC struct yourself.

Sources for pcc / mod / tpf downloads:
Antarius' New Compilation of HR Tex (.MOD & fixed.tpf)   Varied texture mods
HR Textures by Ottemis   Varied texture & mesh mods
OTTE MODS    Hair mesh mods
ELE MODS    Varied texture & mesh mods
ELE's Tumblr    Hair mesh mods
Kani Hime's All Thumbs Production (PCC)   Varied texture & mesh mods
Voodooseason's Tumblr (PCC & .MOD)   Varied texture & mesh mods
Rana's Tumblr (PCC)   Hair mesh mods
wildeatheart27's Tumblr (PCC)   Hair mesh mods
nameislooney's Tumblr (PCC & UPK)   Hair mesh mods


Applying .mods

Applying .MODs is done using ModMaker, it's located under "Tools".
I personally always load through "Jobs", "Add Jobs to list" but you can also go through "File", "Load Jobs". To start applying your loaded mods, go to "Run", "Run all".
While applying mods ME3Explorer can run both hot in memory (but up to a shared cap of 4gigs) and hot on the CPU (up to 100% load on all cores), as such it can go unresponsive at times and lock up your system. You should be able to see it cycle through saving PCC files and applying the mod jobs in the debug window. Heavy mods are not just recognizable by the number of texture replacement jobs, they are also those in which a texture replacement job has a lot of instances in the game's PCC files and ends up having to use multiple threads to save each PCC file with. These are the mods that will spike your CPU usage and overburdening your system while these run is ill-advised. Should your program crash during mod installation, don't worry! Try re-applying the mods in question by loading in less at a time or go one by one and you should be able to reapply the mods without issues. You can also go through "Run", "Run Some" to check loaded jobs on and off. That way you can manually split an already created job list.

Applying .TPFs

In order to apply your Texmod TPF permanently to the game, the developers of ME3Explorer have created a nifty little thing called the "TPF/DDS Tools". It will allow you to load in any .tpf, check it's file formats for validity and if valid, apply it directly to the game as you would a .mod. You can also create your own fresh .mod for the textures with this tool.

This means that downloading a fixed format TPF will ensure you never have to pay attention to the Revision a texture-mod was built with in relation to the version you are using.

Launch ME3Explorer, go to "Tools" and pick "TPF/DDS Tools" in the dropdown menu.
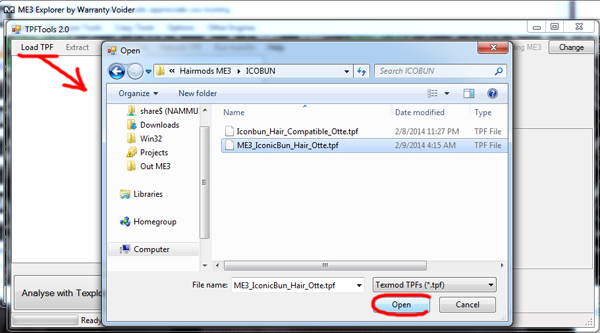
In the window that pops up, click "Load TPF" and browse to the TPF you want to install.
Once you've opened it you'll see that the textures are listed now as is the texmod definition file (def). The definition file will help tell the game where these textures belong.

Every texture has it's own unique hex id or hash number (0xDB481023 for example), the game uses these to match them to the right textures in the game files. Texmod definition files provide the link between the filenames and the corresponding hex id's automatically when the tool can't find these id's in the filename itself. Now down at the bottom it'll tell you the Hashes were generated, click the "Analyse with Texplorer" button to let it scan if the formats are fitting for permanent replacement.
Once it's done it'll say "Finished Matching!". You can now hit "Install valid" to permanently install all valid textures to your game.

Now sometimes you might run into TPF's that are not in the right format and/or cannot be matched to their ingame counterparts. For these and other such issues I suggest you check out the more expansive tutorial on the TPF Tools by KFreon[/url] and the guide on fixing format issues with TPF's by KFreon.

Applying PCC mods

Some modders prefer to release mods by making a modded PCC file available for download rather than creating a .MOD file for mesh releases. ELE08 has written a nice guide on how to install PCC mods.
Be aware that PCC mods overwrite all other edits made to the PCC in question via regular mod application so always replace these first before you mod any other method. The same goes for content mod installers but they have their own install guides so I advise you seek them out and read them if you plan to use them.

Creating .MOD files from TPF

Texplorer was recently expanded with the ability to automatically generate a .MOD from it's base Texmod TPF as long as the file formats are correct.
This is usefull for all the TPF's that haven't been converted to .MODs yet, the recreation of old .MODs from their original TPF's and for people that experience issues with premade .MODs due to language version incompatibilities.
Unfortunately there are not a lot of active texture modders left and most released TPF's will have format issues for compatibility with ME3Explorer. Users like Antarius have made great contributions by creating fixed format TPF files with .MOD repacks by inactive modders to ensure people can easily use and repack their .MODs in the future. Here's a guide by KFreon on how to work with the TPF Tools.

Troubleshooting

When applying a .mod I am getting the following error:


Your version of ME3Explorer is newer than the .mod you are trying to apply and it is no longer compatible. Contact the .mod creator.

When applying a .mod, changes do not show up ingame, why is this?
If you are using REV623 or above, DLC mesh .mods created prior to that REV will no longer apply even though they don't throw a visible error. If this is your problem the debug window will show the following warning when cycling through the jobs it wants to apply:
"Error : Index was outside the bounds of the array."
If you encounter this, please alert the mod creator. Report any other issues to the bug report forums.


I'm getting a DLC authentication error after modding my game, how do I fix this?
As earlier mentioned in the guide, you will need to download a 'patch' that will enable you to mod DLC files while avoiding the authentication issue. Go here and download the files, copy the two provided files into "..\Origin Games\Mass Effect 3\Binaries\Win32\" and click yes when prompted to overwrite.

I'm getting a DLC corruption message after modding my game, how do I fix this?
When you apply mods to the gamefiles and they apply to DLC, they add to the overall size of the SFAR for the DLC in question. When these SFAR grow beyond 2gigs in size individually, they will start throwing corruption errors because the game can't process them properly anymore. To counter this you have two options.
1. Easy method, check which DLC have grown above 2gigs and vanilla them by copying your backup back.
2. Hard method, use the process described here: post8640.html#p8640

I vanilla'd my gamefiles through Origin update or repair but Texplorer still claims I have files modified after Juli 2013 and my treescan fails? 
Unless you throw out all modified files and redownload them from scratch or copy a backup back over that you know with 100% certainty was created right after a fresh install, just using update or repair via Origin will not work. If that is what you have done, you won't be able to see which files were originally modified because it seemingly resets the creation date back to where it should be. Still they are not kosher and you run risk of treescan falling over them. 
You can check the debug output for Texplorer to tell you which files treescan is complaining about and vanilla them properly to try again.

How do I vanilla my game and update my ME3Explorer installation so I can start fresh?
Vanilla basegame: Start by manually throwing away your "PCConsoleTOC.bin" and "PCConsoleTOC.txt" in "..\Origin Games\Mass Effect 3\BIOGame\", and any basegame file in your CookedPC folder that has a date newer than 4/25/2012. Alternately copy in a vanilla backup by hand, more viable for people with slower internet.
Vanilla DLC: Copy in the DLC backup you created AFTER you did your DLC treescan. If you never did a DLC treescan you don't need to do anything.

"Check for Update" by rightclicking ME3 in your Library in Origin, it will reodwnload any missing files. Now, throw out your entire ME3Explorer folder, you should already have a backup of you ME3Tree.bin! Download the latest SVN of ME3Explorer and put your old "ME3Tree.bin" back in the exec folder. When you launch Texplorer, it should tell you it found an existing tree and it won't trigger a rescan.

How do I vanilla my game to basegame and get rid of ME3Explorer completely?
If you have no interest in using ME3Explorer anymore and you want to vanilla, start by manually throwing away your "PCConsoleTOC.bin" and "PCConsoleTOC.txt" in "..\Origin Games\Mass Effect 3\BIOGame\" Now go into "..\Origin Games\Mass Effect 3\BIOGame\CookedPCConsole", sort by modified date and throw out any files that don't have a modified date of 4/25/2012. Be sure to include "CustTextures0.tfc". Now you'll want to "Check for Update" by rightclicking ME3 in your Library in Origin.

Alternately you can vanilla your PCC files by copying in a backup first, if your game is extensively modded and your internet connection speed is not amazing, this might be the better option for you as it won't have to redownload as many files. If you modded your DLC, you'll want to copy those over as well or manually undo changes by restoring the backups created by Texplorer. Method is described further down the troubleshoot section.
 
How do I avoid a rescan of the ME3Tree.bin in between updates?
You can at any given time update or completely refresh your version of ME3Explorer. To ensure that you don't have to unnessecarily rescan your Treestruct anytime you do, you'll want to hold on to a copy of your modified "PCConsoleTOC.bin" and the "me3tree.bin" and if you scanned DLC as well, a copy of your DLC folder. Remember that you cannot rescan the tree on a modded game, so this can save a lot of time.

I have copies of both treestructs, but switching doesn't seem to change anything.
This only applies since the REV 490 fix: Be sure to run Texplorer once between switching your treestruct and trying to apply .MODs to make sure the program is aware of the change.
I am trying to run a .MOD or manually replacing textures, why do I keep getting the following error?

When you first set up ME3Explorer and run your first mod, it will create "Custtextures0.tfc" and create an entry for that file in your "PCConsoleTOC.bin". Some mods seem to fail at generating this entry at times. If you followed this guide to the letter you will have a backed up copy of your modded TOC.bin which you can place back over the vanilla version to restore functionality.

How do I undo changes to basegame files made by a .MOD I just ran? 
You can most easily spot which PCC files were altered by going into your CookedPCConsole folder and sorting list by modified date. Any unaltered basegame files will have a modified date of 4-25-2012. Replace the PCC files with the appropriate modified date with the vanilla backup you have for them. Alternately, throw the modified files out manually and redownload through Origin.

How do I undo changes to DLC files made by a .MOD I just ran?
You can use the debug window to check which DLC files were edited while applying the .MOD:


In this example, DLC_HEN_PR was edited and as you can see, the program notes that an automatic backup was created while editing it. To revert changes all you have to do is go to "..\Origin Games\Mass Effect 3\BIOGame\DLC" and open DLC_HEN_PR, delete "Default.sfar" and rename "Default.bak" back to "Default.sfar". You can also copy your backup over the edited DLC folder.


ANY additional errors or problems should go directly to the official bugreport forums, NOT here.
This post is merely meant to catch most common issues to alleviate the pressure on the mods and admins on the ME3Explorer forums and to weed out known issues and newly discovered bugs that are yet to be resolved.


ME3Explorer bug report Forums

Now go forth and mod to your hearts content.

Thursday, August 29, 2013

MOD: Braided hairstyle for ME3

Note that this mod is PC only! You can't replace Meshes on the consoles. 


This .MOD will include the permanent replacement of the Mohawk Mesh only. You will have to run texmod to apply the textures. TPF is also included in the download. 

http://www.nexusmods.com/masseffect3/mods/55/?


To use this hairstyle on Shepard, do not forget to edit the following values with Gibbed:

Mesh: BIOG_HMF_HIR_PRO.Hair_Mohawk.HMF_HIR_Mhk_MDL
Hair_diff: BIOG_HMF_HIR_PRO.Hair_Short02.HMF_HIR_PROShort_Diff
Hair_mask: BIOG_HMF_HIR_PRO.Hair_Short02.HMF_HIR_PROShort_Diff

If you have never used Gibbed or ME3Explorer before and/or are running into issues here are several useful guides you should definitely check out:

Gibbed - download
Modifying faces in Gibbed
Basics: Modding hair via Gibbed
Scalar / Vector / Texture 
ME3Explorer - download
Tutorial on how to install .MOD files

For those of you that absolutely can't run with texmod but really do want to use this hairstyle no matter what, I'll include a texture replacement .MOD below.
Two things to note though:

  1. This can currently only be replaced as a DXT1 with 1bit alpha, this means I have no gradual alpha and things are either transparent or they're not. This differs from the texmod that includes a DXT5 which features much softer edges. I'll be asking around to see if this is something the guys over at ME3Explorer can do anything about but 0 promises. As it stands that means it will look different from the texmod version. 
  2. Seeing as the BIOG_HMF_HIR_PRO.Hair_Short02.HMF_HIR_PROShort_Diff texture is the one all hair mesh modders use, if you want to switch hairmods, you'll have to either revert BIOG_HMF_HIR_PRO.pcc or run a permament texture replacement .MOD over this one to overwrite it. You can't use texmod on a permanently replaced texture.

Troubleshooting:
I have tried the .MOD but it causes my game to crash to desktop.
a: My advice would be to revert your BIOG_HMF_HIR_PRO.pcc to vanilla and try again.
If you keep experiencing issues make sure you're using rev 472 or above.

I can load un-modded saves but modded saves crash to desktop.
a: This is likely a Gibbed save error.  Make sure there are no extra spaces before or after the codes you have changed.

Disclaimer:

My support begins and ends with the functionality of my mods. I do not cover the inner workings of the tools you'll need to get acquainted with to use mods beyond giving some general troubleshooting tips. Further problems with them are best discussed on their respective websites or support forums.

Do NOT repack or redistribute these files without permission.

Credit:
Much thanks to Apachii from the Skyrim Nexus (ApachiiSkyHair) for providing permission to use and share this hairstyle =)

Monday, August 19, 2013

Guide: Creating Texmod Package Files (TPF) for ME Series Games

What is Texmod?


Texmod is a utility to browse, extract, save and modify textures in Direct3D 9 applications.
In order to share and distribute texture modifications, packages can be created which are compressed to prevent further modification.