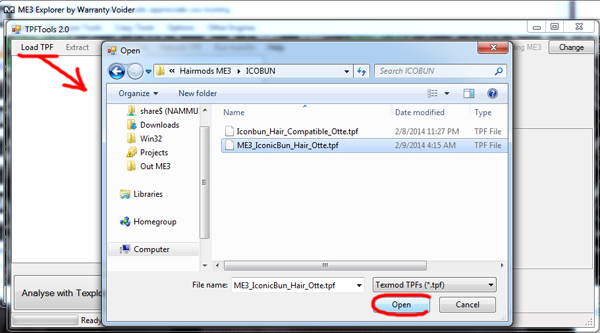
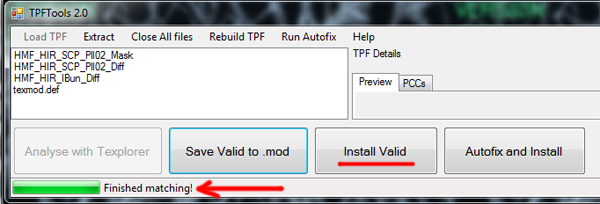
Prologue
My background lies in traditional and digital art. This guide is meant for people like me, who don't have a background in game- or 3D design and won't inherently understand how things tie in together in this particular field. In retrospect, had I known what information to look for before beginning, I'd have had a less difficult time understanding how textures work and how they could be manipulated.
The Mass Effect series was created with an custom version of the Unreal3 Engine.
The engine much determines how textures work and while there is some
nuance between games, the general setup is
largely the same. As an example, I've also done some modding for "
Remember Me" and was easily able to with knowledge acquired modding the ME series.
I've experienced the same with "
Dragon Age: Inquisition", which was built on the Frostbite 3 engine. So, while this guide was initially written for ME(3) texture modding, I've noticed that for DA:I specifically, the principle carries over with the exception of specmap material functions seeming more consistent and normal maps having a different format. The most important thing to remember is that most textures won't make sense until you view each channel separately and to
always mirror against the channel usage of the original texture.
I've sat on this tutorial for a while, having it almost completed and
it's sister sitting in my ME3 modding thread, with the rise of DA:I (texture) modding I figured it a good time to give a final edit and release it.
Texture maps in ME3 and beyond
The following information might not bring anything new to some but it helps to start from the
beginning so we can better understand what ME3 (or most any game for
that matter) does with their textures and how things tie together.
Working with textures for any game isn't so much about
knowing exactly what they've done as it is about
learning to recognize why and how they've done it. Lets take a look how Mass Effect works with texture maps and what you are likely to run into.
Remember that the way a texture functions is determined by the material and cannot be changed on the fly from the texture itself, as such it's important to look at the original closely when planning to edit a texture yourself.
Diffuse map
The diffuse is the most frequently used texture mapping method. It's a bitmap image wrapped directly onto the 3D mesh while displaying its original pixel color. This means that you can use any image as diffuse map to represent photo realistic quality. While some diffuse textures in Mass Effect will indeed hold colour information, others will be greyscale diffuse maps that get their colour information from a separate
tintmap.
Function can be linked to all the different channels on a texture. Any
single texture has up to 4 channels, R (red), G (green), B (blue) and, A
(alpha). When you
use the R/G/B channels together you can create a texture that holds it's
own colour information. Most diffuse textures will also not have a
functional alpha (or lack it entirely) and as such are most often a DXT1
without alpha to save on diskspace (file format). Those with alpha are DXT5. There are
exceptions where colour is not put in the diffuse directly and the
diffuse can be fit onto one channel rather than needing all three and
that's where it can get confusing
.
When creating a custom diffuse map I use both brushes and images for textures.
Good to remember is to avoid images that have lighting effect in them.
While some highlighting and shading is done in the diffuse, most of it
is controlled through the specmap and when you put it in the diffuse
where it wasn't originally, it'll look all kinds of wrong.
On the flipside, if your diffuse does have lighting or shading in places
put it back in! If it's in there, it's in there for a reason! I get
this is hard for people working with a mouse but a lot of people don't do
this and you end up with a flat diffuse that actually makes the whole
look less realistic. This is also the reason I would
suggest to anyone looking to seriously start texture modding to buy a
drawing tablet. It doesn't have to be big, a bamboo is absolutely fine,
it'll make this kind of work TONS easier. A big chunk of work I do on a
diffuse will be manually painted on, having a tablet is a must for me.
If you are looking to introduce more detailing on a flat surface with
little to no texture, you can use layer style screen or overlay to more
easily add structure to it without having to recreate the entire
surface. Be careful that you don't overuse this! There's really
only a handful of places I've been able to use it where it worked,
instead of making the surface look like a bleeding mess. It's not an auto-win button, but
when it works, it saves time. Very situational.
Some tips:
- Use 3DS! Load in your mesh and your diffuse texture so you can
see what you are doing without having to take your texture ingame.
- Group your materials together. Metal with metal, cloth with cloth. It'll make it easier to create the specmap later on.
- Use masks to add colour to elements. This makes it easier to create recolours for your retexture later.
- Put shading and highlighting on a separate layer and/or use masks for this as well.
- Shading and highlighting, put it back on the diffuse when you retexture!
- Learn how to use the pen tool, I can't express how important this tool is.
- Make sure your patterned areas are the same size on each element.
Element wrap sizes differ so having them all the same size on the
texture does not mean they are the same size on the model, quite the
opposite.
- Take your time finding free stock (seamless) textures you can work
with. You can make smart use of content aware fill in Photoshop (CS5+)
to make a texture larger than it originally was. It's success depends on
the textures structure, but be sure to look into it. The quality of a retexture halfly hangs on the quality of the stock used and smart texture selection.
Find common diffuse maps below to get an idea of what one might look like:
Specular map
You use specmaps to define the shininess and highlight colour of a surface.
The higher the value of a pixel (from black to white), the shinier the surface will appear in-game. Therefore, surfaces such as dry stone or fabric would have a very dark specular map, while
surfaces like metal or plastic would have lighter specular maps.
The specular map is a peculiar thing in Mass Effect and has confused quite a lot of people in the past. Specmaps are inherently grey-scale, though in Mass Effect they won't look like they are.
While a diffuse needs the R/G/B channels you don't need those channels on a specmap. A DXT5 for example has 4 possible channels (R/G/B and alpha) and seeing the information held in a texture's channels is in essence just grey-scale information it's often so that these channels are independently used to map different functions. So, while Mass Effect and us modders call these textures the specmap, they are always a combination of several different maps spread over the channels of one texture which will
include the specular map.
Putting all these different functions in channels of the same texture is
essentially a filesize consideration. A texture with R/G/B and a
functional alpha will be a DXT5 with interpolated alpha. Because this
holds information for what would otherwise be 4 unique R/G/B channels
(thus textures) and a DXT5 is about twice the size of a DXT1, they are
saving half the diskspace (roughly put) while gaining flexibility.
Seeing a specular map is in essence grey-scale you'll sometimes see that the information on the R/G/B channels is identical resulting in a desaturated image. However, when you map things per channel the channels together make quite a colourful whole. Check out the specmap for this torso piece:
In this case the "typical" specmap most definitely sits on the green channel; as you can see it's a logical grey-scale with the fabric being slightly darker (less reflective) than the metal and carbon elements. The red and blue channels both completely black out certain elements which means these are both not a traditional specmap but are more likely to be glowmaps or maps that control sheen. The alpha channel clearly maps lights here.
While Mass Effect will often use the same colour channels for the same
kind of functions, they're not completely consistent about their
channels usage and that is really the hardest part of working with a
specmap and creating a custom one. Finding out what function they've
attached to each individual channel through the material itself and how
to manipulate them to get the effect you desire. It's good to remember
that, because any channel information is greyscale knowing that white is
positive and black is negative, making a channel completely white will
flood it's particular function across the surface the texture maps,
alternately make the channel black to cancel out the effect it controls.
It can be an effective way of finding out what any one channel
effectively controls and how it makes elements
look ingame.
Now the function attached to a specmaps channels isn't something you can
manipulate via the texture itself, somewhere in the game (material) they hardcoded which channel maps
which effect. This means that when you replace a mesh with another you
might have to redo the specmap as the channels might not be hooked up to
map and control the same functions.
Here are some of the functions that you can encounter mapped to one of the specmap's channels:
Glow, (coloured) Sheen, (coloured) lights, colour overlay, glossiness, transparency, material overlay effects (like glass for visors), animation frames (for instance animated text overlay cutoff points).
Basically every channel has it's own 'setting' in the material that determines exactly what kind of overlay effect it's tracking, all to make different material types like metal/leather and cloth look as realistic as possible in the engine.
Now sometimes you'll run into diffuse textures that don't seem to have a specmap to go with them, an example of this are the Mass Effect facial textures. Let's look at one of them:
The game needs a specmap to process an object in the lighting-engine, here it's actually hiding in the diffuse alpha. When an object doesn't need a lot of functions mapped to it, the number of channels/textures needed naturally drops where sometimes the separate specmap isn't necessary anymore. Most specmap textures will be DXT5 including an alpha, very rarely you'll encounter a DXT1 spec without alpha or a DXT1 with a 1 bit alpha.
Normal map
Normal Maps provide 3D detailing to an object. They are generated from
the original high poly count 3D model of the mesh in question. As such, it's useful when creating a new normal map to work off the base
of the original. Usually I upscale the original, depending on the
object about half the size of the diffuse/spec unless it maps a
full-body surface in which case I sometimes end up going up to 4096 on
the diffuse and normal map alike. I then use the diffuse and
Nvidia's normal map filter for Photoshop to generate a normal map.
I only tend to replace the original normal map in places where I changed
the textures to such an extend as it being unavoidable. All other times
I will smooth out the jagged edges on the original and overlay
detailing generated with the Nvidia normal map
preserving the original normal map.
ME3's normal maps are V8U8's. I save my edited normal maps as a BMP in
Photoshop, then use the Direct X texture tool to convert to V8U8 and
generate MIPs. Using a different file format will wreak havoc on your texture seams ingame. If you are modding a different game you can assume the same applies for it's native normalmap format and replacing it with one in a different format.
Some tips:
- Using the Photoshop normalmap filter, dark elements are automatically indented
and light elements extruded. If you are trying to generate a map for a
metal surface with white scratches, on default settings the filter will
extrude them instead of indent. Flip the Z axis if you want to reverse
this. You can cut and paste bits together with the axis inverted or
normal depending on what kind of material surface you are dealing with.
- You
can run the filter several times on different hardness (5-60) settings,
then overlay each layer on a percentage to get a nice and fluid normal
map with more depth.
- If your normal map becomes too pitted and
irregular due to the diffuse detailing, consider running a gaussian blur
over the diffuse before you run the filter.
Find common normal maps below to get an idea of what one might look like:
I am adding a little note here in regards to DA:I normal maps as these have a different native format and will need to be edited differently. DA:I normals are in ATI2 (3Dc) format, it has two channels (X/Y instead of R/G/B). The Photoshop DDS plugin decompresses the X/Y blocks and stores them in the R/G channels (the wrong way around mind you). When the opened texture is flagged as a normal, R/G/B is reconstructed from the R/G channels. Unfortunately, this makes the normalmap look 'wrong' upon import into Photoshop.
Now I used to eyeball the changes necessary to convert the opened normal back to what it should be by manually switching the red and green channel and messing with the contrast for those channels. However, I've recently stumbled across
this workflow by MediAsylum on DeviantArt which makes the process entirely foolproof. Go thank them for being awesome. Here's a step by step:
- Open your extracted normalmap in Photoshop.
- In the NVidia DDS Read Properties window select "Convert images to 32bits"
- Upon opening, go to "Image - Mode - 16 bits/Channel".
- Select "Exposure and Gamma" from the dropdown and hit "OK".
- Go to "Image - Adjustments - Levels..." and change the center value from 1.00 to 0.45
- Go to "Image - Adjustments - Channel Mixer" and switch the red and green channel info (select red in the dropdown, change red 100% to 0 and green 0% to 100, then do the opposite for the green channel).
Et
voila. You can now edit your normals as you're used to. When you're
happy with your changes, save it as a 3Dc through the DDS plugin.
For reference, below you'll see a normal as previewed in the tool, after
export/opening in Photoshop, before flipping the channel info and after applying ALL changes as mentioned
above. Note that an extracted normal opened in the Compressonator also has switched R/G channels (3rd image).
NB: If you previously got rid of the NVidia DDS Read Properties dialog popup (like I did), you can get it back by saving a random image as a DDS and pressing "Read Config..." in the save dialog window. This'll pop it back up and you can recheck the box to re-enable the dialog.
Tint map
Tintmaps are used to add colour to a surface with a greyscale diffuse. They function as a colour overlay on-top of the diffuse greyscale
information (much like a colour overlay layer works in Photoshop) preserving all detail on the diffuse itself and making it possible to have multiple colours of an item without needing a custom diffuse for every variant.
In essence these are function maps, with information either positive (white) or negative (black).
Tintmap channels all mask function dictated by the material. As an example:
You can see how the R/G/B data together looks and how the channels separately look, if an alpha is present it would hold the same kind of black/white data as on the R/G/B, masking parts of the texture surface for material control. You can't manipulate the function each channel maps from the texture, this is determined by the material itself.
Stripe map
Stripemaps are used to add pattern-colour to a 3D model with a greyscale diffuse and tintmap.
They function as a colour overlay on-top of the diffuse greyscale
information
, much like the tintmap.