To the effect of being able to edit and successfully import hairstyles into Mass Effect 3, ELE has taught me the basics of using 3dsMax 2012. This tutorial covers what she's taught me, and what we've learned about hair conversion since.
Now obviously the use of 3dsMax is no picnic, so it is very conceivable this won't make much sense to you the first time you try and you will be fiddling with the controls quite some. Be bold!
If you encounter start-up issues, give it some time. Look up some more advanced tutorials etc. What I'm about to put down here will be extremely basic and will expect you to take initiative in getting to know the program.
Getting started
Depending on the source, your hairstyle will have a certain extension. Start by installing the
(Bethesda) and the ActorX
Importer AND
exporter for 3dsMax 2012(Mass Effect).
Note: I am using Bethesda files as an example, but any mesh works on
the same principles. The nif importer plugin only works for 3DS versions 2012 or below.
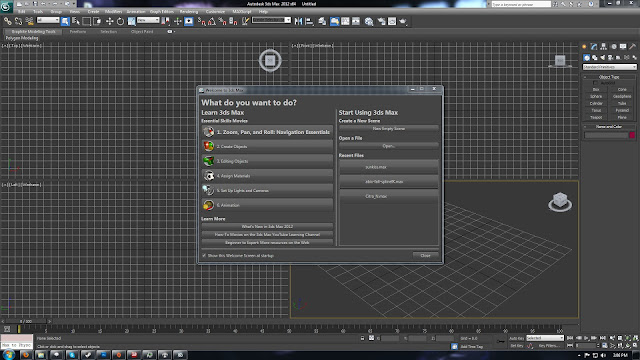
Once you've started up 3ds this is what you will see. I advise you click and watch the first link in the startup screen, it's only a few minutes worth of video.
What we're going to do first (though this is completely optional) is revert to one viewport instead of the standard four. Go to
view, viewport configuration, layout. Click the first option,
apply, ok.
Let's import a model. Seeing as we're looking into editing hair, how about we grab the female head from ME3, we'll need it to align new hair to later. To make this easy I've uploaded the file
here.
This is a psk file, so we'll need to use the ActorX importer you installed.
Go to
MaxScript in the top navigation bar, select
run script in the dropdown menu. Browse to the location where you saved
ActorXImporter.ms, select it and hit
open.
Now, in the window that pops up, hit
Import PSK... and browse to the location where you saved the female head, select it and hit
open. You'll be treated to a top view of the model.
Try moving around the mesh. You can click and hold the left mouse-button to drag your screen and use the scrollwheel to zoom in and out when the viewport is active. In the top right corner of the viewport you'll see a cube that lists all faces, click the faces to snap to them or hold and drag on a corner to rotate and tilt manually. With the wheel under the cube you can rotate view. Try clicking next to the head to deselect it and then re-selecting it and play with the rotation and zoom controls. Take some time to get familiar with it =)
In the top left corner of your viewport you'll notice it says
[Top][Realistic], click on them to change them (personally I use
[Perspective] but vary on the second). You can try different ones and see how they affect the model.
Before we continue past this section, change your view/position to something similar to this:
Picking a hairstyle
As we've installed an importer for nif files we're going to limit search to Bethesda game mods. This would include Skyrim, Oblivion, Morrowind and the Fallout Series. Most of these mods use ported hairstyles that originate from other games, most commonly the Sims franchise. Conveniently, you can browse the Nexus sites for these games to check available mods.
Skyrim Nexus
Oblivion Nexus
Fallout3 Nexus
Fallout New Vegas Nexus
I'm going to use the Skyrim
ApachiiSkyHair Pack for purpose of this tutorial. Specifically I'll be working with hairstyle number 21 which is a long female hairstyle with a braid and ponytail. Download whichever hair you want to work with, or use the same one I'm using if that's easier for you.
Importing and editing
Files with the .nif extension you can import using 3dsMax's import function. Click the '
start' icon in the topleft corner on the navbar and simply pick
Import.
Browse to the location of the mesh you want to import and select the correct file, in my case that's:
..\ApachiiSkyHair_v_1_5_Full-10168-1-5-Full\ApachiiSkyHair_v_1_5_Full\Data\meshes\actors\character\character assets\hair\apachii\female\hair21.nif
Now on the popup window for nif import, uncheck
Import Skeleton and hit
Import. Your viewport will now realign itself with the newly added mesh! It should show up screen-filling. If you're wondering where the head mesh went, select your viewport and scroll to zoom out:
Now there are several things to note here. The orientation of the mesh is important! As we are modding Mass Effect, the hair needs to be aligned with the position of the head.
Note: The difference between location of the hair and head
completely depends on which game the hair was meant to work with. If you
for instance port Sims hair, it's conceivable the initial location is different from what I'm showing you here.
Before we start moving the hair though, we will be removing the skin attached to the hair mesh. We will have to regenerate the skin later, but for now it can interfere with the edits we are about to make so it will have to go.
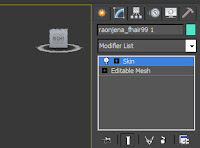
Select the hair and on the right side of your interface, you'll notice it says skin, above editable mesh.
Right-click and select
delete in the dropdown menu.
Note: If you'd rather not reskin from scratch and are working with a Mass Effect mesh, right-click and select
cut in the dropdown menu instead. You can
paste it back in when you're done editing the mesh.
Navigate around the meshes to get a better view of their position relative to each other. As you can see, the hair is:
1. too small in comparison to the head
2. facing the wrong way
3. at the wrong height
What I've noticed is that when you scale up a mesh, it will
automatically move up. So we're going to tackle these three
discrepancies in the order they are listed to make sure we don't do
unnecessary double work.
To scale up the hair, select it by left clicking it, right-click to open the drop-down menu and select
Scale. Your cursor will change icon to a tiny triangle. Now in the viewport ontop of the hair mesh, left-click and hold while moving your mouse up, you'll notice the hair will both scale up and move up simultaneously.
Now to rotate the hair, select it then right-click to open the drop-down menu and select
Rotate. Left-click and hold on the mesh and move your mouse to the left or right to rotate.
To move it along the X/Y/Z axis, select it then right-click to open the drop-down menu and select
Move. You can try to reposition the mesh with your mouse but I would advise using the X/Y/Z boxes at the bottom of the viewport. There are little arrows next to the input boxes so you can easily move along any axis in small increments.
Use all three (
Move, Rotate, Scale) to reposition the hair until you are happy with it's location. You'll want to rotate your view often so you can check for clipping issues more easily (note the ears) and to see how big the gap between the hair and the skull is at several points.
Note: You shouldn't touch the location of the head. If you accidentally move it at any point revert with
control-z or select the headmesh, right-click and select
move in the drop-down menu, then enter 0 (zero) for X,Y and Z on the bottom navbar.
On my example below you can see I switched to
[Perspective][Realistic],
as it emphasizes the shadows nicely on the edges of the mesh, so I can easily see the distance between elements. Note how nicely the mesh
wraps around the ear. This isn't always the case, I'll cover
repositioning of individual elements below this section.

Having done what you can just moving and rescaling the entire mesh, it's time to rework individual parts to fit around the head better.When you have the mesh selected you'll notice on the right of the viewport the selection menu is visible. At the top it shows icons for five ways of selecting parts of your mesh.
Vertex, Edge, Face, Polygon and
Element. For now select
Element. When you click through the various parts of the mesh, you'll notice entire strands lighting up bright red as you select them. You can move them over any axis using the arrows that show up in the middle of the selected element.
Whenever you would like to move certain parts of an element, it is advised to pull that particular element out, then select
vertex under selection to move the vertices. This way you don't run risk selecting vertices on different elements than the one you're looking to alter. You can select multiple points by either left-click dragging your mouse over an area or by clicking individual elements while holding
control.
If you would like to push or pull an entire area of the mesh out, you can do this by using
soft selection. The number belonging to
falloff under
Affect Backfacing determines how much of the surrounding area is affected. You can see how big the area affected is when you pick
vertex under selection. The colour the vertices of the surrounding area determines how much they are influenced.
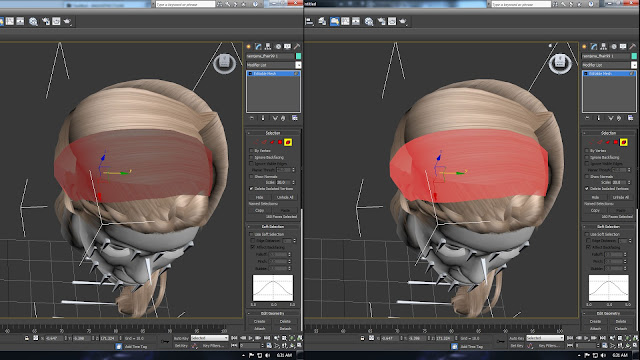
Here I'm using
Polygon selection to push in an area of the mesh closer to the skull, closing the gap by using the y axis arrow. I'm using a
Falloff of 5. This is trial and error depending on the area you want affected. Result is on the right.
By selecting a vertex or element and pressing
delete, you will completely remove it. Note that this might look weird on the textured mesh ingame. There are some instances however where this is necessary, which I'll illustrate later in this tutorial.
Texturing your mesh
Adding a diffuse and normal
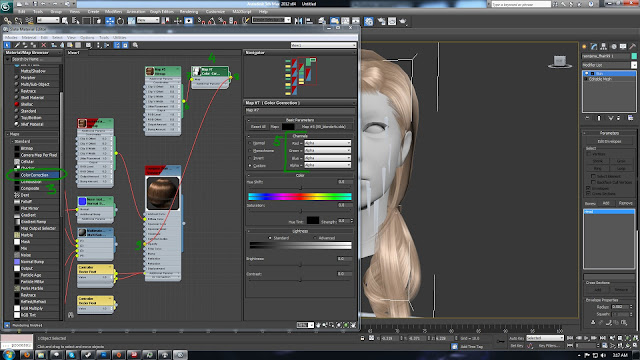
Some might prefer to edit meshes with it's textures applied so I'll add a little section on how to do this. While having your mesh selected press M. This will open up the
Slate Material Editor. Double-click your mesh name under
Scene Material (
1), this will open up the Navigator and fill View1. You'll want to move the active area in View1 via the
Navigator (
2), position it so the red/green blocks are visible. Now in
View1, double-click on the top box (
3) that has "textures" and "bitmap" in the name. This will open up the
Bitmap Parameters (
4). When you click on the texture path right under the header, this will open a file-picker (
5). Browse to the textures that came with the mesh download. In the case of my hair the path would be:
..\ApachiiSkyHair_v_1_5_Full-10168-1-5-Full\ApachiiSkyHair_v_1_5_Full\Data\textures\actors\character\hair\apachii\Raonjena\
Once selected, you'll notice the little icon in
View1 changed, but no textures are applied to the mesh yet. Now, double-click the box that has "Norm" in the name from
View1. Click the texture path behind "
Normal:" in the
Parameters box. This will open another menu in the same area that looks exactly like the one you just saw for the first texture (
4). Again, click the texture path directly under
Bitmap Parameters and browse to the texture location. This should be the same as the first one, and it should default to that location now. You should now see the texture applied to your mesh!
Adding a working alpha
Open up the Material Editor again with
M. Double-click the
main box, select
Blinn in the dropdown menu under
Shader Basic Parameters and check
2-Sided.
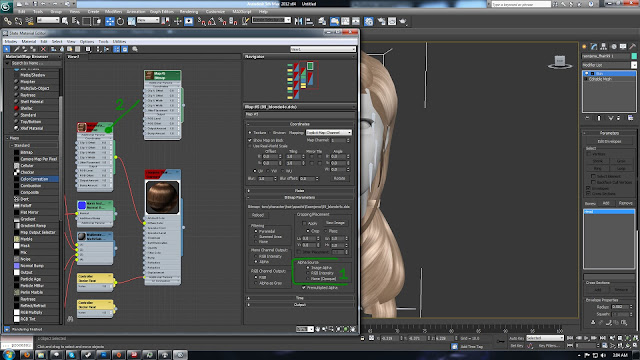
On your diffuse texture box, check
Image Alpha under
Alpha source (
1). Select the box for the diffuse texture, hold shift and drag and drop to duplicate it (
2).
Now drag and drop a
ColorCorrection box (
3) from the
Material/Map Browser into
View1 (4). Doubleclick it and change the dropdown values for all the channels to
Alpha on the right under
Basic Parameters (
5).
Click and drag the bubble on your duplicate diffuse (
6) and connect it to the bubble on the ColorCorrection box (
7). Now connect the other bubble on the ColorCorrection box (
8) to the bubble on the main box next to Opacity (
9).
Weighting your mesh
Basic
Now for the fun part. Remember when we removed the skin at the beginning of this tutorial? We'll be adding it back in now.
It's function is weighting the mesh down according to the bones your mesh is linked to.
You
can use whichever mesh you plan to replace ingame and take it's bones
for your project. This way the mesh will import without issues and cause
no crashes ingame.
The game can become unstable when the number of
bones on the mesh you are replacing isn't equal to your new mesh and
meshplorer currently does not allow it anymore and will throw an error.
Knowing that, use either the human skull, any of the CC hairstyles or
for instance Allers hair to steal bones for your weighting dependent on
which mesh you plan to replace ingame.
Now on most hairstyles we can simply add a 'head' bone that will automatically affect the entire mesh.
This
means that when the characters' head animates, the hair will move with
it at the same angle. This is fine for short bobs and updo's but can
cause clipping on longer styles. It's also adequate for testing purposes, as we'll need to go ingame a couple of times and test out our hair and subsequent changes on (an unwilling) Shep.
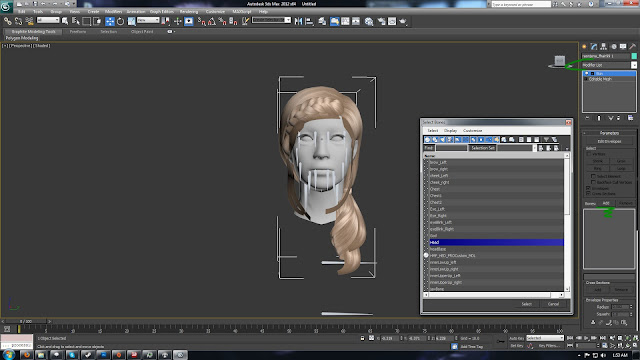
Select your mesh. Above
Editable Mesh on the right of the viewport you'll notice it says
Modifier List with a dropdown arrow. Click it and type in "skin". This will jump you down, select
Skin there. Now under Parameters press the
Add button next to "Bones:", highlight
Head in the popup window and press
Select.
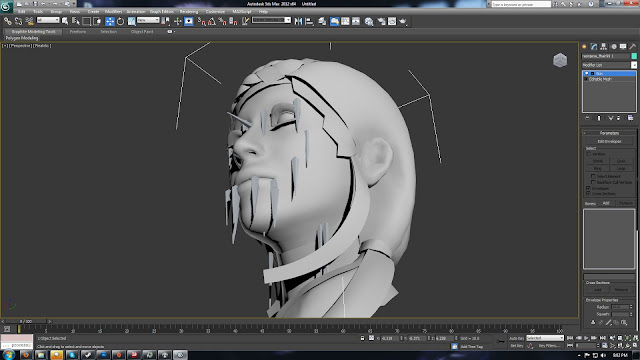
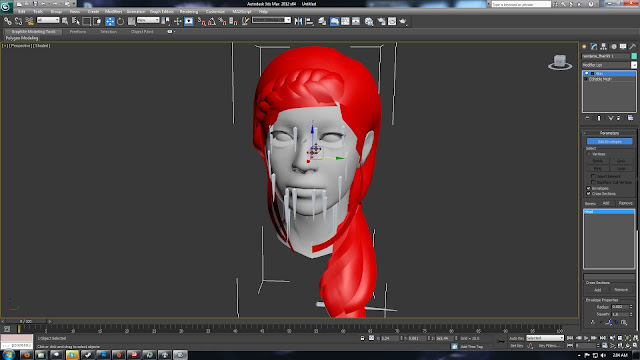
To actually see what just happened, press
Edit Envelopes right under
Parameters, you'll see the entire hair mesh turn bright red. Red indicates that it is fully affected by the selected bone, which in this case is the Head bone. You'll notice it also displays the actual bone inside of the mesh with axis arrows attached to it.
Intermediate
Using skin-wrap we can copy the weights of another mesh onto the one we've created. In terms of meshes that generally have the same shape and are not horribly complex, this method will do nicely.
What we want to do is find an existing mesh that has about the same length, let's say.. Allers hair. To make this easier, I have uploaded the hairstyle
here.
As explained earlier, psk files are opened through the
ActorX Importer under
MAXScript,
Run Script. Import the hair you just downloaded. Now select your own mesh. In the
Modifier List type in "skin" and select
Skin Wrap.
Under
Parameters, you'll see an empty box with an
Add button below it. Click it and select the other mesh. In this case it should add
HMF_HIR_PROJessica_MDL to the previously empty box now.
Click
Add again to remove the highlight, make sure
Weight All Points is checked, then click the
Convert To Skin button at the bottom of the Parameters box. You'll now have skin and skin wrap listed above editable mesh, you can remove
skin wrap.
Advanced
For the masochists among us, manual weighting explained in short. I want to use the bones that come with the Allers mesh, so I'll be opening that one again and deleting the hairmesh. As before,
ActorX Importer under
MAXScript,
Run Script.
We'll add the
Skin modifier, then add two bones to the envelope:
Head and
LeftCollar.
Select Skin above Editable Mesh, In the list of Bones, select
Head. Click on Edit Envelopes so you can see which area of the mesh the bones affect. As you might have noticed, the Head bone affects the entire mesh, we'll want some of the lower parts affected by the Collar-bone so we minimize clipping, so select
LeftCollar now. See where the bone is? Right on our ponytail.
Scroll down to
Weight Properties and uncheck
Paint Blend Weights. Now you'll see a little wrench-tool icon there, click on the
Paint Weights button right under it. When you move your mouse over the mesh now, your cursor will change. There are two ways we can adjust the brush: in size and strength/opacity. To adjust the size, hold
control and
shift while you drag and hold your
left mouse-button up or down. You'll notice the brush changing size and it affecting the displayed radius number. To change the strength of the brush, hold
shift,
control and
alt while you drag and hold your
left mouse-button up or down, you'll notice the value for strength changing.
Now let's paint some weights! Red is fully affected, yellow less so, blue etc. A softer brush will allow you to create smoother transitions. You can switch between head and leftcollar if you make a mistake. You'll notice that whichever area you painted over on the leftcollar is now reflected on the head. Aim for something like this:
Exporting and testing your mesh ingame
First, delete the head mesh out of your project, you can leave the bones. Just select the head and hit delete. Now to export your hair, click the
utilities tab on the right navbar.
Click on
More..., select
ActorX and hit
OK.
This will open an export menu in the right navbar. Select an
output folder and type in a
name for your mesh. Scroll down and uncheck
bake smoothing groups, now you can hit
Save mesh/refpose.
Now watch
the following tutorial by WarrantyVoider for the remaining steps on how to get your mesh into the game. For reference, the PCC files containing the hair are as follows:
BIOG_HMM_HIR_PRO_R.pcc (male) and
BIOG_HMF_HIR_PRO.pcc (female)
Note: Do NOT skip a step
when importing and saving va the UDK. You will need your mesh to be a
UPK package, not a PSK when you import into the game via ME3Explorer.
Converting the hair texture
I use photoshop for this. As Mass Effect uses it's own system for the recolouring of hair to conform to CC colours, you'll need to convert your texture to work correctly in the engine.
There's a simple way of doing this. Open the texture in Photoshop, add a new layer and paintbucket it
#008e00. Now doubleclick the layer and select
Multiply as the
blend mode.
Save as a DDS: DXT5 with integrated alpha. If you can't you're probably lacking the plugin, you can
get it here =)
To create a texmod .TPF for the hair, the identifier to replace the
deprecated ME2 custom cute hair textures is
0x487289A3. For a tutorial on creating a texmod .TPF,
check here.
To use the custom cute textures on the Shep that's testing the Mesh, use
Gibbed and change the texture values for
Hair_Diff and
Hair_Mask to
BIOG_HMF_HIR_PRO.Hair_Short02.HMF_HIR_PROShort_Diff
Note: If you have any transparency issues ingame, you'll have to check the alpha channel on your texture. It might be that the contrast is too low and your white's not really white in which case the game will make the entire hair slightly transparent.
Troubleshooting texture problems
When you go ingame to check your mesh, there are several potential problems with mesh-imports that aren't always easy to spot in 3dsMax.
This picture shows the first I want to cover nicely. This weird lighting issue you are seeing has to do with duplicate strands overlaying eachother in the mesh. There are a few tricks to spotting these early and ways of fixing the issue.
In 3dsMax, when you have enabled the alpha texture layer, you might have noticed a weird transparency issue with some of the elements. It's easy to spot on this particular mesh as the elements are quite large on the top of the head.
If you haven't applied textures at all, switch to
[Perspective][Consistent Colors] and you might notice weird blotchy spots on the mesh. It SHOULD be evenly tinted in either white or grey per element.
Thirdly and consistently, when you select the mesh and use the
Element selection tool, you'll notice when clicking some strands that they are in fact dark red instead of the normal bright red. I'll emphasize the difference with an image comparison below:
From what I can gather, the darker colour indicates the back of an element. When the back is exposed in Mass Effect 3's engine, the lighting on it sort of inverts itself which causes the weird blackness. It can also cause weird streakyness in thinner strands with alpha transparency. Seeing how some strands will either curl around and reveal all sides from one perspective or show it's back some other way, you'll have to decide on a case by case basis whether to completely remove or simply edit elements when trying to fix this issue.
Simply click on an element and it will cycle through both overlayed elements. Select the darker red one and hit
delete. You'll need to be careful you don't create any bald spots while deleting strands.
Also check out the following method of dealing with these strands
by andrastessanctifiedgirdle on Tumblr who explains how to easily flip them as an alternate to deleting or moving them.
If you still see some areas of the hair ingame where the strands don't look right, make a couple of screenshots so you know where this is happening and go back into 3ds.
In much rarer cases you'll notice that when you pull a strand out, it will be weirdly connected and stretch another strand as you pull!
Control select the second strand as well, then
pull them both further out. You'll want to switch from
element to
polygon selection and select those stretched bits and
delete them. They are sometimes connected to another normal strand but not always, if they are let the normal elements be.
Note: Save your project as a max file, so you preserve the skin and weighting settings between exports. This will be better to load in inbetween small edits then working with your exported mesh.
Fixed!
Have fun and good luck =)


